2023.05.07 - [공부 기록] - [SPRING] 스프링이 Event를 다루는 방법 - ApplicationEventPublisher
[SPRING] 스프링에서 Event를 다루는 방법 - ApplicationEventPublisher
2023.03.08 - [생각 정리] - [GOORM x COMMIT] 기술 부채를 바라보는 다른 시각 - 양수열 [GOORM x COMMIT] 기술 부채를 바라보는 다른 시각 - 양수열 https://blog.goorm.io/javaoracle/ 양수열 소장, “개발자 마음속의
ktae23.tistory.com

** spring 5.3 버전을 참조했습니다.
저번 글에 이어 스프링에서 Event를 다루는 방법 중 Listener에 대해 작성해보겠다.
Listener는 EventListener와 TransactionalEventListener로 나누어 설명하겠다.
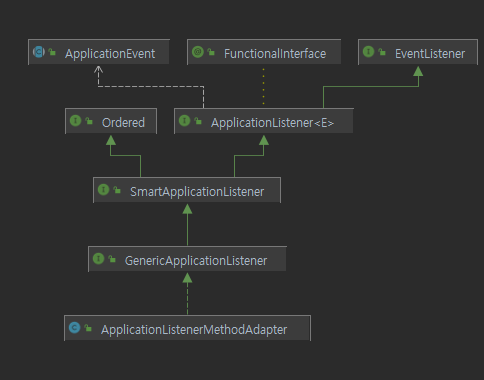
먼저 EventListener를 보겠다. 이벤트 리스너의 하위 타입 중 콘크리트 클래스인 ApplicationListenerMethodAdapter 를 주목해보자.

여기서 GenericApplicationListener는 아래와 같이 지원하는 타입의 제네릭인지 체크하는 역할을 하며
@Override
default boolean supportsEventType(Class<? extends ApplicationEvent> eventType) {
    return supportsEventType(ResolvableType.forClass(eventType));
}
SmartApplicationListener의 주석에 "일반 이벤트 유형을 전체적으로 검사하려면 대신 GenericApplicationListener 인터페이스를 구현하는 것이 좋습니다." 와 같은 문구가 있는 것을 보면 역할이 크게 다르지 않은 것 같다.
public interface SmartApplicationListener extends ApplicationListener<ApplicationEvent>, Ordered {

	boolean supportsEventType(Class<? extends ApplicationEvent> eventType);

	default boolean supportsSourceType(@Nullable Class<?> sourceType) {
		return true;
	}

	@Override
	default int getOrder() {
		return LOWEST_PRECEDENCE;
	}

	default String getListenerId() {
		return "";
	}

}
이들 인터페이스를 를 구현하며 실제 이벤트를 처리하는 로직은 ApplicationListenerMethodAdapter에 구현되어 있다.
어댑터의 생성자는 아래와 같다.
public ApplicationListenerMethodAdapter(String beanName, Class<?> targetClass, Method method) {
    this.beanName = beanName;
    this.method = BridgeMethodResolver.findBridgedMethod(method);
    this.targetMethod = (!Proxy.isProxyClass(targetClass) ?
            AopUtils.getMostSpecificMethod(method, targetClass) : this.method);
    this.methodKey = new AnnotatedElementKey(this.targetMethod, targetClass);

    EventListener ann = AnnotatedElementUtils.findMergedAnnotation(this.targetMethod, EventListener.class);
    this.declaredEventTypes = resolveDeclaredEventTypes(method, ann);
    this.condition = (ann != null ? ann.condition() : null);
    this.order = resolveOrder(this.targetMethod);
    String id = (ann != null ? ann.id() : "");
    this.listenerId = (!id.isEmpty() ? id : null);
}
이 생성자를 호출하는 클래스는 EventListenrFactory 인터페이스를 구현한 DefaultEventListenrFactory로 별도로 구현하지 않는 한 기본 팩토리 클래스가 어댑터를 생성한다.
public class DefaultEventListenerFactory implements EventListenerFactory, Ordered {

	private int order = LOWEST_PRECEDENCE;


	public void setOrder(int order) {
		this.order = order;
	}

	@Override
	public int getOrder() {
		return this.order;
	}


	@Override
	public boolean supportsMethod(Method method) {
		return true;
	}

	@Override
	public ApplicationListener<?> createApplicationListener(String beanName, Class<?> type, Method method) {
		return new ApplicationListenerMethodAdapter(beanName, type, method);
	}

}
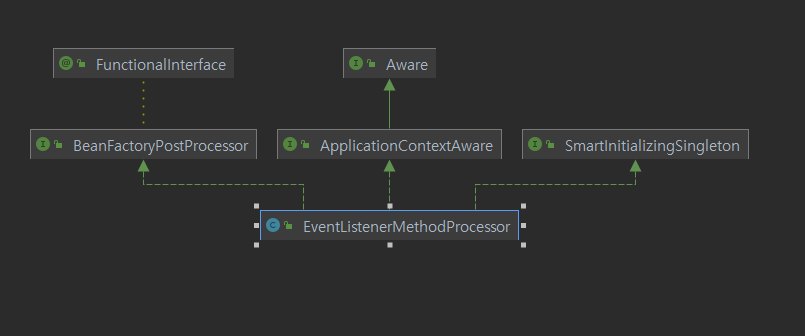
그리고 이 EventListenrFactory 의 createApplicationListener 메서드는 EventListenerMethodProcessor에서 호출된다.

클래스 다이어그램을 보면 알겠지만 EventListenerMethodProcessor는 ApplicationContext의 생성에 관계 된다.
EventListenerMethodProcessor 클래스의 processBean 메서드를 보면 EventListener 어노테이션이 선언 된 모든 메서드를 가져온 뒤 비어있지 않다면 아래 로직을 수행한다.
조금 길지만 천천히 읽어 보자.
if (CollectionUtils.isEmpty(annotatedMethods)) {
    this.nonAnnotatedClasses.add(targetType);
    if (logger.isTraceEnabled()) {
        logger.trace("No @EventListener annotations found on bean class: " + targetType.getName());
    }
}
else {
    // Non-empty set of methods
    ConfigurableApplicationContext context = this.applicationContext;
    Assert.state(context != null, "No ApplicationContext set");
    List<EventListenerFactory> factories = this.eventListenerFactories;
    Assert.state(factories != null, "EventListenerFactory List not initialized");
    for (Method method : annotatedMethods.keySet()) {
        for (EventListenerFactory factory : factories) {
            if (factory.supportsMethod(method)) {
                Method methodToUse = AopUtils.selectInvocableMethod(method, context.getType(beanName));
                ApplicationListener<?> applicationListener =
                        factory.createApplicationListener(beanName, targetType, methodToUse);
                if (applicationListener instanceof ApplicationListenerMethodAdapter) {
                    ((ApplicationListenerMethodAdapter) applicationListener).init(context, this.evaluator);
                }
                context.addApplicationListener(applicationListener);
                break;
            }
        }
    }
    if (logger.isDebugEnabled()) {
        logger.debug(annotatedMethods.size() + " @EventListener methods processed on bean '" +
                beanName + "': " + annotatedMethods);
    }
}
중간에 List<EventListenerFactory> factories = this.eventListenerFactories;를 순회하며 supportsMehtod 를 호출하고 반환 값이 true일 경우 AopUtils을 활용하여 어노테이션이 선언 된 메서드를 호출한다.
이때 리스너가 ApplicationListenerMethodAdapter 유형의 인스턴스일 경우 init 메서드를 호출하여 컨텍스트를 초기화하고 해당 리스너를 컨텍스트에 추가해준다.
Method methodToUse = AopUtils.selectInvocableMethod(method, context.getType(beanName));
ApplicationListener<?> applicationListener =
        factory.createApplicationListener(beanName, targetType, methodToUse);
if (applicationListener instanceof ApplicationListenerMethodAdapter) {
    ((ApplicationListenerMethodAdapter) applicationListener).init(context, this.evaluator);
}
context.addApplicationListener(applicationListener);
이처럼 ApplicationContext가 생성될 때 @EventListener 어노테이션이 선언 된 메서드를 순회하며 Application Context에 리스너로 등록한다.
잘 알려져있는 당연한 사실이지만 이 때문에 EventListener 는 Bean으로 등록 되어야 한다.
메서드 이름부터가 processBean이다.
지금까지 이벤트 리스너를 생성하는 순서를 쫓아왔다.
이제는 리스너가 동작하는 방식을 확인해보자.
다시 ApplicationListenerMethodAdapter로 돌아와보자.
이 클래스에는 누가봐도 이벤트를 처리할것 같은 processEvent(ApplicationEvent event) 라는 시그니처의 메서드가 있다.
/**
	 * Process the specified {@link ApplicationEvent}, checking if the condition
	 * matches and handling a non-null result, if any.
	 */
public void processEvent(ApplicationEvent event) {
    Object[] args = resolveArguments(event);
    if (shouldHandle(event, args)) {
        Object result = doInvoke(args);
        if (result != null) {
            handleResult(result);
        }
        else {
            logger.trace("No result object given - no result to handle");
        }
    }
}
여기서 shouldHandle(event, artgs) 메서드는 SPEL을 지원하기 위한 메서드로 EventExpressionsEvaluator가 표현식의 조건을 판별하여 boolean을 반환한다. 별도의 처리가 없다면 doIvoke(args)를 실행시켜 결과를 얻어 낼 것이다.
이때 doInvoke 메서드는 보통의 Bean을 실행시키는 프록시의 역할과 동일하기에 따로 확인하지 않겠다.
간단히 설명하자면 listenr bean이 null이거나 이외 각종 예외 케이스가 아니라면 넘겨 받은 인자를 넘겨 method를 invoke하고 그 결과를 그대로 반환하는게 전부다.
어쨋든 이 결과를 그대로 넘겨받고 null이 아니라면 handleResult(result)를 수행한다.
여기서 listener의 반환 값이란 이전 게시글에서 설명했던 내용이다.
또한 @EventListener 어노테이션이 달린 메서드에서 null이 아닌 값을 반환하면 해당 결과를 새 이벤트로 발행하며 컬렉션으로 반환할 경우 여러 개의 새 이벤트를 게시할 수도 있다.
전달 받은 결과가 비동기 처리를 위한 객체일 경우를 위한 분기가 있으며 결과적으로 publishEvents를 호출하여 1개 이상의 이벤트 들에 대한 처리를 한다.
protected void handleResult(Object result) {
    if (reactiveStreamsPresent && new ReactiveResultHandler().subscribeToPublisher(result)) {
        if (logger.isTraceEnabled()) {
            logger.trace("Adapted to reactive result: " + result);
        }
    }
    else if (result instanceof CompletionStage) {
        ((CompletionStage<?>) result).whenComplete((event, ex) -> {
            if (ex != null) {
                handleAsyncError(ex);
            }
            else if (event != null) {
                publishEvent(event);
            }
        });
    }
    else if (result instanceof ListenableFuture) {
        ((ListenableFuture<?>) result).addCallback(this::publishEvents, this::handleAsyncError);
    }
    else {
        publishEvents(result);
    }
}
private void publishEvents(Object result) {
if (result.getClass().isArray()) {
Object[] events = ObjectUtils.toObjectArray(result);
for (Object event : events) {
publishEvent(event);
}
}
else if (result instanceof Collection<?>) {
Collection<?> events = (Collection<?>) result;
for (Object event : events) {
publishEvent(event);
}
}
else {
publishEvent(result);
}
}
정리해보자.
1. EvenetListenrMethodProcessor가 AnnotaionUtils를 활용해 @EventListener로 등록 한 메서드와 EventListenr 클래스 하위 타입을 전부 조회한다.
2. EventListenerFactory들을 순회하며 지원하는 메서드인지 확인하여 지원하는 경우 이들 전부를 컨텍스트에 등록한다.
3. ApplicationListenerMethodAdapter에서 이 빈들을 활용하여 이벤트 메서드를 실행시킨다.
이쯤 되니 예외 처리나 재시도 전략에 대해 궁금해진다.
지금까지 코드를 읽어본 바로는 기본적으로 동기 식이라 그런지 에러 로그를 남기고 끝이다.
그럼 비동기일 때는 어떻게 처리할까?
protected void handleAsyncError(Throwable t) {
    logger.error("Unexpected error occurred in asynchronous listener", t);
}
놀랍게도 마찬가지로 에러 로그만 남기고 끝이다.
따로 재시도 처리가 지원되지 않는 것은 조금 아쉬운 점이었다.
AOP를 활용해야 하기 때문에 Retryable과 동시 적용을 할 수 없어서 별도의 빈으로 Retry를 처리하도록 하고 Listener에서 이를 주입하도록 처리해야 하기 때문이다.
다음 게시글로는 TransactionalEventListener에 대해 작성하겠다.
2023.05.07 - [공부 기록] - [SPRING] 스프링이 Event를 다루는 방법 - TransactionalEventListener
[SPRING] 스프링이 Event를 다루는 방법 - TransactionalEventListener
2023.05.07 - [공부 기록] - [SPRING] 스프링이 Event를 다루는 방법 - EventListener [SPRING] 스프링에서 Event를 다루는 방법 - ApplicationEventListener 2023.05.07 - [공부 기록] - [SPRING] 스프링에서 Event를 다루는 방법 -
ktae23.tistory.com
'공부 기록' 카테고리의 다른 글
| [SPRINGXSECURITY] 스프링 시큐리티 "/" 경로 웰컴 페이지(index.html ) 허용하기 (0) | 2023.06.11 |
|---|---|
| [SPRING] 스프링이 Event를 다루는 방법 - TransactionalEventListener (0) | 2023.05.07 |
| [SPRING] 스프링이 Event를 다루는 방법 - ApplicationEventPublisher (0) | 2023.05.07 |
| [JAVA x OPENAPI] 공공데이터포털 특일 정보 OpenAPI 사용하기 - 3 (통합 테스트) (0) | 2023.02.15 |
| [JAVA x OPENAPI] 공공데이터포털 특일 정보 OpenAPI 사용하기 - 2 (JSON 응답을 JAVA 클래스로 받기 + 테스트) (0) | 2023.02.15 |


댓글