2022.11.12 - [공부 기록] - [SPRING SECURITY] WebSecurityConfigurerAdapter Deprecated - 최신 설정 방법
[SPRING SECURITY] WebSecurityConfigurerAdapter Deprecated - 최신 설정 방법
2022.10.09 - [공부 기록] - 스프링 시큐리티의 우아한 멀티 타입 빌더 [SPRING SECURITY]우아한 멀티 타입 빌더 스프링 시큐리티를 사용한다면 우리는 WebSecurityConfigurerAdapter 를 확장하는 클래스를 구현해
ktae23.tistory.com

얼마 전 구글 스프레드 시트 API 연동 작업을 진행했다.
이때 특정 시간에 요청이 몰렸고 Read time out이 자주 발생했다.
운영상 필요한 내용이라 성공이 반드시 보장되어야 했고, 혹시라도 실패할 경우 따로 수동으로 처리할 수 있어야 했다.
필요한 내용은 나왔고 구현을 시작해 보자.
우선 재시도가 필요한 메서드를 마킹해야 하니 어노테이션 하나를 만들자.
그리고 어노테이션에 재시도가 필요한 예외를 넘기자.
동시에 요청이 몰려서 예외가 발생하면 어차피 똑같이 실패할 테니 재시도는 랜덤 하게 흩뿌려줘야겠다.
이 과정에서 재시도 전략에 대해 찾아보니 back off 알고리즘과 Jitter에 대해 알게 되었다.
https://aws.amazon.com/ko/blogs/architecture/exponential-backoff-and-jitter/
오 이거다. N번 만큼 M 초 뒤에 다시 시도해, 근데 M은 랜덤이야.
어노테이션 이름은.. 아 @Retryable이 좋겠다. 구현은 대충.. 음 이런 느낌?
@Target({ElementType.METHOD, ElementType.TYPE})
@Retention(RetentionPolicy.RUNTIME)
public @interface Retryable {

    Class<? extends Throwable>[] value() default {};
    int max() default 3;
    long backoff() default 1000L;
    long jit() default 1;

}
재밌겠다~~ 이슈 정리해야지...... 그런데 이때 사수의 한마디

그거.. 스프링에 있어요. 한번 확인해 보세요.
그렇다. 우리의 스프링은 없는 게 없다.
https://github.com/spring-projects/spring-retry
GitHub - spring-projects/spring-retry
Contribute to spring-projects/spring-retry development by creating an account on GitHub.
github.com
심지어 이름도 똑같다. @Retryable이고 @Backoff까지 있고 @Recover를 사용해 실패 시 동작까지 설정할 수 있다.
@Retryable
@Target({ElementType.METHOD, ElementType.TYPE})
@Retention(RetentionPolicy.RUNTIME)
@Documented
public @interface Retryable {
    String recover() default "";

    String interceptor() default "";

    Class<? extends Throwable>[] value() default {};

    Class<? extends Throwable>[] include() default {};

    Class<? extends Throwable>[] exclude() default {};

    String label() default "";

    boolean stateful() default false;

    int maxAttempts() default 3;

    String maxAttemptsExpression() default "";

    Backoff backoff() default @Backoff;

    String exceptionExpression() default "";

    String[] listeners() default {};
}
@Backoff
@Target({ElementType.TYPE})
@Retention(RetentionPolicy.RUNTIME)
@Documented
public @interface Backoff {
    long value() default 1000L;

    long delay() default 0L;

    long maxDelay() default 0L;

    double multiplier() default 0.0D;

    String delayExpression() default "";

    String maxDelayExpression() default "";

    String multiplierExpression() default "";

    boolean random() default false;
}
@Recover
@Target({ElementType.METHOD, ElementType.TYPE})
@Retention(RetentionPolicy.RUNTIME)
@Import({RetryConfiguration.class})
@Documented
public @interface Recover {
}
적용 예제
@Retryable(value = GoogleSheetsException.class // 재시도 할 예외
        , maxAttempts = 5 // 최대 실행 횟수
        , backoff = @Backoff(random = true // 재시도 시간 랜덤 적용 여부
        , delay = 100 // 재시도 지연 시간
        , maxDelay = 3000) // 재시도 지연 최대 시간
)
public void excuete(GoogleSheetsDto dto){
    // do something;
}


@Recover
public void recover(GoogleSheetsException exception, GoogleSheetsDto dto) {
// 첫 번째 인자로 예외를, 두 번째 이후로는 @Retryalbe을 적용한 메서드와 같은 인자를 받는다.
    // do something;
}

// 또는 Retryable 인자로 RetryListener 인터페이스의 구현체를 확장한 Listener를 구현하여 커스텀 할 수 있다.
이게 전부다.
잘 알다시피 AOP를 활용했기 때문에 접근제어자가 public이어야 한다.
이 정도로만 작성하면 재시도가 가능하다.
또는 버전 1.3부터 명령형으로 작성 하여 사용 할 수 있는데 예제는 아래와 같다.
RetryTemplate.builder()
      .maxAttempts(10)
      .exponentialBackoff(100, 2, 10000)
      .retryOn(IOException.class)
      .traversingCauses()
      .build();

RetryTemplate.builder()
      .fixedBackoff(10)
      .withinMillis(3000)
      .build();

// =======================================

RetryTemplate template = RetryTemplate.builder()
      .infiniteRetry()
      .retryOn(IOException.class)
      .uniformRandomBackoff(1000, 3000)
      .build();

template.execute(context -> {
    // do someThing
});
Spring Retry 프로젝트 저장소의 README.md를 읽어 보면 정말 자세하게 설명이 되어 있다.
블로그에서는 다들 간단히 사용하는 위와 같은 예제만 보여주지만 좀 더 중요한 재시도 정책이 필요하다면 꼭 확인해보자
https://github.com/spring-projects/spring-retry
GitHub - spring-projects/spring-retry
Contribute to spring-projects/spring-retry development by creating an account on GitHub.
github.com

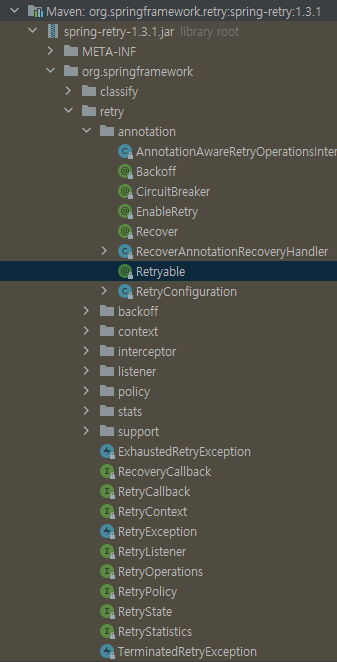
이름만 봐도 뭐 하는 녀석들인지 보인다.
역시 스프링이 제공하는 라이브러리는 볼 때마다 추상화 수준이 높아서 배울 게 많다.
하지만 이전에 스프링 시큐리티 때처럼 아직 한눈에 속속 알아보기엔 내가 부족하다.
프로젝트 저장소의 설명과 각 클래스를 가볍게 살펴본 바로는 어노테이션을 통해 넘겨받은 설정값을 사용해 RetryPolicy를 구현한 정책 객체들을 만들고 RetryTemplateBuilder를 사용해 RetryOperations를 구현한 RetryTemplate를 만들어 실행한다.
스프링 라이브러리의 수많은 라이브러리 중 하나의 동작 원리와 구현 기법을 이해하려 노력하는 것만으로도 많은 걸 배울 수 있다.
이젠 생각한 기능을 직접 구현하는 재미를 동력 삼아 무작정 만들어보려 하는 단계인 것 같다.
직접 바퀴를 만들어 보는 시도도 좋겠지만, 그보다는 잘~~ 만들어진 바퀴를 찾아 사용하도록 해야겠다.
'공부 기록' 카테고리의 다른 글
| [JAVA x OPENAPI] 공공데이터포털 특일 정보 OpenAPI 사용하기 - 2 (JSON 응답을 JAVA 클래스로 받기 + 테스트) (0) | 2023.02.15 |
|---|---|
| [JAVA x OPENAPI] 공공데이터포털 특일 정보 OpenAPI 사용하기 - 1 (공공데이터 포털 활용 신청) (0) | 2023.02.13 |
| [SPRING SECURITY] WebSecurityConfigurerAdapter Deprecated - 최신 설정 방법 (0) | 2022.11.12 |
| [SPRING SECURITY]우아한 멀티 타입 빌더 (0) | 2022.10.09 |
| [Network] 액세스 회선 (0) | 2022.07.18 |


댓글